Deep Fried Philly Steak

In a stroke of pure genius this weekend, my brother created the Deep Fried Philly Steak. For the benefit of mankind, I shall hereby document the process:

Use a frying pan with a touch of olive oil to sautee some vegetables. We used onion, green pepper, mushrooms, and minced garlic, like these:

They might not look so great raw, but fry these bad boys up...

When the vegetables are sauteed to perfection, add sliced beef. We used steak-ums, but I imagine this would be better with something fresher. Fry ’til the beef is done, then add some cheese blend. It’ll look something like this, but more:

Delicious meat... and fat

Next, roll out some roll-up pizza dough, we used the Pillsbury Classic Pizza Crust for ours. Place six slices of provolone on the rolled-out pizza crust and cut in to six squares. Place a ball of your fried treat on each of the slices of provolone:

This is what you're looking for.

Finally, you can top with some mayo if you truly hate your vascular system:
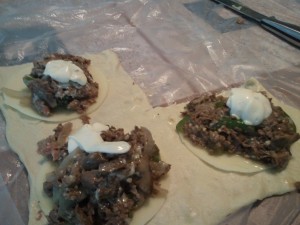
It's a heart attack in the making.

Pull the four corners up to meet in the center so you have four points sticking out, then grab these and fold them up as well. Make sure there aren’t any gaps through which you can see steak, you should have a ball of stretched dough with no holes. Drop this in to the deep fryer, which you should have pre-heated to 375 degrees Farenheit filled with vegetable oil (or lard I guess, but I wanted to be alive to write this).

You can tell it's done when it floats, but I let it go 'til it's good and brown

When it’s done (golden brown and floating, you may need to turn them to get an even fry) pull them out and place them on some paper towels to soak up some of the liquid death in which they sit. You now have the most amazing treat ever created. Enjoy.

Philly steak, in convenient ball form.

Compiling heimdall on Ubuntu 10.10

Heimdall is an open source replacement for the Samsung Galaxy S flashing utility called Odin. I like this because I can’t stand windows, so if I were to have “bricked” my Vibrant, I’d have been pretty well screwed until I found a friend with a windows machine. Now, there’s an option for us “regular” folks that don’t like to pay the microsoft tax just to use our hardware.

First things first, you’ll need some development packages, so run this command from the terminal:
sudo aptitude install build-essential libusb-1.0-0-dev

Next, you’ll need the hiemdall source from here. You’ll want to get the linux source archive.

Now unzip the source to a folder in your home directory, I use ~/source/. There should now be a folder called “Heimdall-Source”.

Change directories to Heimdall-Source and run the following commands:
./configure
make
sudo make install

You now have heimdall installed. The README file in the Heimdall-Source folder has information on use of the tool, but the important things to know are that you must run it with sudo, you’ll need to untar any .tar or .tar.md5 files you have in the odin bundle (tar xvf filename.tar), and include only the parameters from the source that match files you actually have in your odin tarball (if there’s no Spl.bin in your tarball, don’t include the “–secondary Sbl.bin” part of the heimdall command). If your odin bundle contains all of the files heimdall can use, your command would look like this:
sudo heimdall flash --pit s1_odin_20100512.pit --factoryfs factoryfs.rfs --cache cache.rfs --dbdata dbdata.rfs --boot boot.bin --secondary Sbl.bin --param param.lfs --kernel zImage --modem modem.bin

Minimalist fcgid with custom php.ini on cPanel

I recently changed to using fastcgi on my personal cPanel server (11.28, CentOS) and thought others might benefit from my findings, as I wasn’t able to find any complete configuration tutorials.

I was able to replicate the functionality I enjoyed from SuPHP (per directory php.ini configurations) with a simple wrapper script that’s called using an “Action” parameter in the .htaccess file.

To start, you’ll need to run EasyApache:
/scripts/easyapache
I have disabled “Mod SuPHP” from the easyapache configuration and enabled “Mod FCGID”. This was the only change required to enable FastCGI support using the system php.ini configuration.

I reviewed many forum posts on the topic of local php.ini configuration with fcgid, but none really focused on the per-user aspect and how it can be user definable. I accomplished this with a very simple wrapper script for php-cgi that sets the PHPRC shell variable to the desired path, then a handler and action in .htaccess to call the script for handling php files. This allows for different directories to use different php.ini configurations by creating a different wrapper for each php.ini required.

First, edit the wrapper with your favorite text editor:
nano -w ~/public_html/php5.fcgi
Note, the name is arbitrary, but it needs to be in cgi-bin. Add the following code:
#!/bin/sh
PHPRC=~/public_html/
export PHPRC
exec /usr/local/cpanel/cgi-sys/php5

Then save, and make it executable:
chmod 755 ~/public_html/php5.fcgi

Next, you need to associate it with .php (and any other you’d like) extensions. Add these two lines to ~/public_html/.htaccess (or any .htaccess file)
AddHandler php5-fastcgi .php
Action php5-fastcgi /cgi-bin/php5.fcgi

You can add additional extensions to the AddHandler line like so:
AddHandler php5-fastcgi .php .phtml .html

Update: The above instructions will break subdomains and addon domains if a separate php5.fcgi is not placed in each sub/addon cgi-bin folder. To combat this, I’m using a system accessible php5.fcgi that sets PHPRC to ~/public_html/. To do the same:
nano -w /usr/local/cpanel/cgi-sys/php5.fcgi
Then add this code:
#!/bin/sh
PHPRC=~/public_html/
export PHPRC
exec /usr/local/cpanel/cgi-sys/php5

Set permissions correctly:
chown root:wheel /usr/local/cpanel/cgi-sys/php5.fcgi
chmod 755 /usr/local/cpanel/cgi-sys/php5.fcgi

Finally, change .htaccess to use the new path:
AddHandler php5-fastcgi .php
Action php5-fastcgi /cgi-sys/php5.fcgi

That’s it. It’s generic, can be copied to any user account without modification, and uses system configs for fcgid options, so it can use sane defaults.

I’ve uploaded my cpanel3-skel folder with perms set in case you would like to use it on your server.  Click here.

Update:
Helius reports in the comments that the steps above can break Fantastico on the server. To correct this, you’ll need to build cPanel’s PHP:
/scripts/makecpphp
Thanks for the info Helius!